Simple Chat NPCs
This section aims to guide you through the process of creating NPCs that can hold interactive conversations. It assumes that you have completed the project setup and have configured the OPENAI_API_KEY user secret.
The NPC Sprite
Here we will create a basic sprite that we can attach chat functionality to.
In the
ArguingTrollsscene that we created in Setting up the Semantic Godot Project insert aNode2Dnode and rename it toNPC.With the
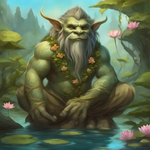
NPCnode selected, add aSprite2Dnode. This makes a visible sprite for our character.To set the image for our NPC sprite, copy the troll portrait (shown below) into the project. Then in the inspector, set the image as the
Textureproperty for theSprite2Dnode.Drag the
NPCnode near the center of the scene. Build and run the project to see the river troll NPC token.
Meet Gralk:
The ChatEntity class
Here we a define a base class called ChatEntity for all chat-enabled entities in the game.
This type encapsulates basic properties like a name and a description, and, later,
it handles behaviors such as detecting other nearby chat entities. Subsequently,
we will extend this node type to create ChatAI for GPT-4 driven NPCs and
ChatPlayer for player characters.
Right-click the filesystem dock and select “New Script…”. Make sure the language
is set to C# and it inherits from Node2D.
Save this script as ChatEntity.cs in the project’s root directory.
To register this script with the Godot editor, add the [GlobalClass] attribute right above the class declaration.
[GlobalClass]
public partial class ChatEntity : Node2D
{
    ...
}
For more information about Godot’s global classes, see https://docs.godotengine.org/en/stable/tutorials/scripting/c_sharp/c_sharp_global_classes.html
Exported Properties
We’ll add two properties: ChatName and ChatDescr. ChatName stores the
entity’s name and will be visible to any nearby entities, while ChatDescr
holds a description of the entity. Both properties are exported for easy
modification in the Godot inspector.
Put the following inside the ChatEntity class.
[Export]
public string ChatName = "";

[Export(PropertyHint.MultilineText)]
public string ChatDescr = "";
After saving the script, attach it to the NPC node in the main scene.
Rebuild the project by clicking the “Build” button in the upper right corner of the
editor. Then inspect the properties of the NPC. You should see ChatName and ChatDescr.
Next, we will add methods for handling messages: SendMsg and ReceiveMsg.
The SendMsg method is called when the entity wants to send a message to another
entity. It prints the message to the console and then emits a MsgSent signal
with the message as an argument.
ReceiveMsg is called when the entity receives a message from another entity.
We expect this method to be overridden by a child class because the behavior of
receiving a message will be different for different types of entities.
[Signal]
public delegate void MsgSentEventHandler(string msg);

public virtual void SendMsg(string msg)
{
    GD.Print(ChatName + ": " + msg);
    CallDeferred("emit_signal", "MsgSent", msg);
}

public virtual void ReceiveMsg(string msg)
{
    // This function will be overridden later by a child class
}
Finally, we need to add a field to store a reference to our current conversation
partner. This will be used later to send messages to the other entity.
This _inConvoWith field is declared as internal so that it can be accessed
by the main game class.
internal ChatEntity _inConvoWith;
Now the completed ChatEntity class should look like this:
using Godot;
using System;

[GlobalClass]
public partial class ChatEntity : Node2D
{
    [Export]
    public string ChatName;

    [Export(PropertyHint.MultilineText)]
    public string ChatDescr;

    internal ChatEntity _inConvoWith;

    [Signal]
    public delegate void MsgSentEventHandler(string msg);

    public virtual void SendMsg(string msg)
    {
        GD.Print(ChatName + ": " + msg);
        CallDeferred("emit_signal", "MsgSent", msg);
    }

    public virtual void ReceiveMsg(string msg)
    {
        // This function will be overridden later by a child class
    }
}
The ChatAI class
Now we will create a new node type called ChatAI that extends ChatEntity
and adds the ability to use GPT-4 to generate responses to messages. This class
will be used for NPCs that can hold interactive conversations.
Create ChatAI.cs with the following content.
using Godot;

using System;
using System.Threading.Tasks;
using System.IO;

using Microsoft.SemanticKernel;
using Microsoft.SemanticKernel.AI.ChatCompletion;
using Microsoft.SemanticKernel.Connectors.AI.OpenAI.ChatCompletion;
using Microsoft.SemanticKernel.TemplateEngine.Prompt;
using Microsoft.Extensions.Configuration;

[GlobalClass]
public partial class ChatAI : ChatEntity
{
    // Used for making calls to OpenAI.
    protected IChatCompletion _chatGPT;

    // The chat history, including system messages.
    protected OpenAIChatHistory _chat;

    // The semantic kernel.
    protected readonly IKernel _kernel;

    // For variable substitution into prompts.
    protected readonly PromptTemplateEngine _promptRenderer;
}
Detach the ChatEntity script from the NPC node and instead attach this new
ChatAI script. Rebuild the project to register the new ChatAI node with the Godot editor.
Later in the tutorial we will instantiate ChatAI nodes from the inspector instead of attaching
the script to the NPC node directly.
ChatAI Constructor
The constructor fetches the OpenAI API key dynamically
from the dotnet user-secret store via GetApiKey(),
and then initializes ChatGPT and the semantic kernel.
This is also where GPT-4 is chosen as the model.
public ChatAI()
{
    string apiKey = GetApiKey();
    _promptRenderer = new PromptTemplateEngine();
    _kernel = new KernelBuilder()
        .WithOpenAIChatCompletionService("gpt-4", apiKey, "")
        .Build();
    _chatGPT = _kernel.GetService<IChatCompletion>();
}

// Get the OpenAI API key from user secrets
private string GetApiKey()
{
    var configuration = new ConfigurationBuilder()
    .AddUserSecrets<ChatAI>()
    .Build();

    var apiKeyVarName = "OPENAI_API_KEY";
    var apiKey = configuration[apiKeyVarName];

    if (apiKey == null)
    {
        throw new System.Exception($"Please set the {apiKeyVarName} user secret.");
    }

    return apiKey;
}
Ready
The _Ready() method reads the NPC’s personality template from a file,
renders it with the PromptTemplateEngine, and then adds the rendered
personality to the chat history.
Note
For a more in-depth understanding of what system messages are, consult OpenAI’s Chat Completions API Documentation.
Tip
The NPC.txt file doesn’t define the personality of your NPC. Instead, it
offers general guidelines for behavior that all NPCs should adhere to. You’re
encouraged to experiment with different sets of instructions in NPC.txt
to yield NPCs with nuanced behaviors.
public override void _Ready()
{
    var npc_template = File.ReadAllText("personalities/NPC.txt");
    var context = _kernel.CreateNewContext();
    context.Variables["personality"] = ChatDescr;

    string npc_personality = _promptRenderer.RenderAsync(npc_template,
                                                         context)
                                           .GetAwaiter()
                                           .GetResult();
    _chat = (OpenAIChatHistory)_chatGPT.CreateNewChat();
    _chat.AddSystemMessage(npc_personality);

    base._Ready();
}
The suggested content of personalities/NPC.txt is
You are playing an NPC in a dungeons and dragons simulator of Castle Ravenloft.
Respond only in character. Responding out-of-character ruins the immersion of
the game.

You will be interacting with both other NPCs and players. You will not
know which is which.

The players enjoy good jokes and shenanigans.  The environment is lighthearted,
but don't try too hard to be funny, let it come naturally. This is very much a
its-the-journey-not-the-destination kind of game, where the humor and mystery
are FAR more important than the fantasy story. The fantasy story is there to
provide a backbone for the party to have fun with.  Feel free to laugh,
poke fun, love, dislike, and generally exhibit the range of human emotions that
a professional actor would put on display.

This is a dialogue-based game. Answer in the form of dialogue. Keep conversation continuity.

The player you are interacting with is a stranger that you have not met before.
Therefore you must treat what they say with caution. They might be telling the
truth, they might not be.

Below is a character sheet for background. It DOES NOT indicate
the FORMAT of your responses, but all of your responses must be
consistent with the character background below.

+++++ BEGIN CHARACTER SHEET +++++
{{ $personality }}
++++ END CHARACTER SHEET +++++
Receiving Messages
The ReceiveMsg method is called when the NPC receives a message from another
entity. It starts a new Task that calls ReceiveMsgAsync. This is done so that
the main thread can continue to run while the NPC is waiting for a response from
GPT-4.
// Called when ChatEntity _inConvoWith emits a MsgSent signal
public override void ReceiveMsg(string msg)
{
    // Call the async method but don't wait for it
    Task.Run(() => ReceiveMsgAsync(msg));
}

public async Task ReceiveMsgAsync(string msg)
{
    try
    {
        // Add the message to the chat history.
        _chat.AddUserMessage(msg);

        // This is the call to GPT-4 to get the reply.
        ChatRequestSettings settings = new();
        string reply = await _chatGPT.GenerateMessageAsync(_chat, settings);

        // Send the reply to the other entity via the MsgSent signal
        SendMsg(reply);

        // Add the reply to the chat history.
        _chat.AddAssistantMessage(reply);
    }
    catch (Exception ex)
    {
        string errMsg = $"Could not get reply from {ChatName}: {ex.Message}";
        GD.PrintErr(errMsg);
    }
}
Two Arguing NPCs
In this section, you will learn how to set up NPCs named “East Troll” and “West Troll” to automatically argue with each other using Godot’s inspector. These trolls are configured to have a debate about which side of the river is better.
Creating the East and West Troll Nodes
Create an NPC Scene: Drag the
NPCnode from the main scene into the filesystem dock to create a new scene. This will convert the node in the main scene to an instance of the new scene. (You can also right click on theNPCnode and select “Save Branch as Scene”.)Second NPC: Create a second troll by dragging the
npc.tscnscene into the scene tree. This should add a second instance of theNPCnode to the main scene.Rename Nodes: Name the nodes to
WestTrollandEastTroll. Place the tokens on the left and right sides of the scene, respectively.
Troll Personalities
Edit West Troll: Find the
ChatNameproperty in the inspector and set it to “West Troll”. Then find theChatDescrproperty and input the description: “I argue with the East Troll about why my side of the river is far better.”
Edit East Troll ChatDescr: Similar to the West Troll, set
ChatNameto “East Troll” and enter a description that states, “I engage in a passionate debate with the West Troll over why my side of the river is superior.”
Save and Run: Save the scene and run your game to ensure that the troll NPCs are in place and ready to argue.
Modify the ArguingTrolls.cs script to connect the two trolls together.
using Godot;
using Microsoft.SemanticKernel;

public partial class ArguingTrolls : Node2D
{
    public override void _Ready()
    {
        GD.Print("Semantic Kernel is ready!");

        // Get the troll ChatEntities
        ChatEntity eastTroll = GetNode<ChatEntity>("EastTroll");
        ChatEntity westTroll = GetNode<ChatEntity>("WestTroll");

        eastTroll._inConvoWith = westTroll;
        westTroll._inConvoWith = eastTroll;

        // Connect up the MsgSent signals
        eastTroll.MsgSent += westTroll.ReceiveMsg;
        westTroll.MsgSent += eastTroll.ReceiveMsg;

        // Start the conversation
        eastTroll.SendMsg($"I am the {eastTroll.ChatName}! And my side is the best side of the river!");
    }
}
Now run the scene and watch the trolls argue!